SXI Forum
You are not logged in.
- Topics: Active | Unanswered
#26 HOWTOS » Warning about SSL when connecting to MYSQL » 08-09-2020 21:26:04
- SeanR
- Replies: 0
With the following configuration in a XLayer workflow Connector configuration:
    <Connector id="MySQL_DB_Connector" type="MYSQL">
      <Connection xsi:type="sxi:MYSQL">
        <sxi:Server>localhost</sxi:Server>
        <sxi:User>sxiadmin</sxi:User>
        <sxi:Password>T@gi2b2</sxi:Password>
        <sxi:RetryDelay>30</sxi:RetryDelay>
        <sxi:DBName>xlayerrestapi</sxi:DBName>
        <sxi:Port>3306</sxi:Port>
      </Connection>
      <sxi:ReturnCodes>
        <sxi:Success />
        <sxi:RecoverableError>
          <sxi:Code>I/O Error: Read timed out</sxi:Code>
          <sxi:Code>Invalid state, the Connection object is closed.</sxi:Code>
          <sxi:Code>I/O Error: Connection reset by peer: socket write error</sxi:Code>
        </sxi:RecoverableError>
      </sxi:ReturnCodes>
    </Connector>
if you try to connect to a MYSQL v8 database you will receive a message in the X-ServiceBroker/bin/error.log log file which looks as follows:
WARN: Establishing SSL connection without server's identity verification is not recommended. According to MySQL 5.5.45+, 5.6.26+ and 5.7.6+ requirements SSL connection must be established by default if explicit option isn't set. For compliance with existing applications not using SSL the verifyServerCertificate property is set to 'false'. You need either to explicitly disable SSL by setting useSSL=false, or set useSSL=true and provide truststore for server certificate verification.You will not be able to connect to the database and will get the following errors in the workflow's logfile:
21:10:45.110 - ERROR - Connection failed with error 'getConnection failed, using driver org.gjt.mm.mysql.Driver. Reason:Communications link failure

The last packet successfully received from the server was 13 milliseconds ago.  The last packet sent successfully to the server was 13 milliseconds ago.' after attempt 2, waiting 30s before connecting again
za.co.sxi.exceptions.DatabaseConnectionException: getConnection failed, using driver org.gjt.mm.mysql.Driver. Reason:Communications link failure

The last packet successfully received from the server was 13 milliseconds ago.  The last packet sent successfully to the server was 13 milliseconds ago.
This is due to a new requirement for SSL when connecting to the database. This can easily be turned off by changing the Connector configuration as follows:
<Connector id="MySQL_DB_Connector" type="MYSQL">
      <Connection xsi:type="sxi:MYSQL">
        <sxi:Server>localhost</sxi:Server>
        <sxi:User>sxiadmin</sxi:User>
        <sxi:Password>T@gi2b2</sxi:Password>
        <sxi:RetryDelay>30</sxi:RetryDelay>
        <sxi:DBName>xlayerrestapi</sxi:DBName>
        <sxi:Properties>
          <sxi:Property name="useSSL" value="false"/>
        </sxi:Properties>
        <sxi:Port>3306</sxi:Port>
      </Connection>
      <sxi:ReturnCodes>
        <sxi:Success />
        <sxi:RecoverableError>
          <sxi:Code>I/O Error: Read timed out</sxi:Code>
          <sxi:Code>Invalid state, the Connection object is closed.</sxi:Code>
          <sxi:Code>I/O Error: Connection reset by peer: socket write error</sxi:Code>
        </sxi:RecoverableError>
      </sxi:ReturnCodes>
    </Connector>
The important piece that was added was the
<sxi:Properties>
<sxi:Property name="useSSL" value="false"/>
</sxi:Properties>
However, while this will work it may not be the best and most secure solution. An excellent explanation can be found here
This may need some additional configuration options to be added to XLayer. These will be discussed in a future version of XLayer. The above is a working solution in the meantime.
#27 Re: HOWTOS » XSLT Stylesheets - Remove namespaces » 30-06-2020 15:10:44
When we convert a JSON object to an XML one there are a number of additional attributes that are included in order to show us what type of data in in the new XML element. E.g. type="string".
Often we do not want to send these additional attributes to our clients and so remove them with a stylesheet. However if we do not use the correct namespaces we end up with
xmlns=""
in the xml output. This is because the child elements are in a different namespace from the parent.
E.g. The "OutputMemoryToLog" looks as follows:
<?xml version="1.0" encoding="UTF-8"?>
<XServiceBroker xmlns="http://www.sxi.co.za/XMLSchema">
  <payload>
    <Object xmlns="">
      <number type="string">INC0000123</number>
      <short_description xmlns="">ACME - Test 123</summary
      ...
     </Object>
  </payload>
</XServiceBroker>
When we apply the following stylesheet:
<xsl:stylesheet version="1.0" xmlns:xsl="http://www.w3.org/1999/XSL/Transform">
    <xsl:output indent="yes" method="xml" encoding="utf-8" omit-xml-declaration="yes"/>

    <xsl:template match="/">
        <data>
            <ref_num><xsl:value-of select="//*[local-name()='number']"/></ref_num>
            <summary><xsl:value-of select="//*[local-name()='short_description']"/></summary>
            ...
        </data>
    </xsl:template>
</xsl:stylesheet>
However after we have transformed the xml it looks as follows:
<?xml version="1.0" encoding="UTF-8"?>
<XServiceBroker xmlns="http://www.sxi.co.za/XMLSchema">
  <ref_num xmlns="">INC0000123</ref_num>
  <summary xmlns="">TCM - Test 123</summary>
  ...
</XServiceBroker>
To ensure your output does not have xmlns-"" in each element you need to add the xmlns="http://www.sxi.co.za/XMLSchema" declaration to your stylesheet. This will create the new elements in the same namespace as the parent in the "OutputMemoryToLog" object.
<xsl:stylesheet version="1.0" xmlns="http://www.sxi.co.za/XMLSchema" xmlns:xsl="http://www.w3.org/1999/XSL/Transform">
    <xsl:output indent="yes" method="xml" encoding="utf-8" omit-xml-declaration="yes"/>

    <xsl:template match="/">
        <data>
            <ref_num><xsl:value-of select="//*[local-name()='number']"/></ref_num>
            <summary><xsl:value-of select="//*[local-name()='short_description']"/></summary>
            ...
        </data>
    </xsl:template>
</xsl:stylesheet>
The result will now look correct:
<?xml version="1.0" encoding="UTF-8"?>
<XServiceBroker xmlns="http://www.sxi.co.za/XMLSchema">
  <ref_num>INC0000123</ref_num>
  <summary>ACME - Test 123</summary>
  ...
</XServiceBroker>#28 Re: SXI Web Services » XLayer API v3.0 » 02-03-2020 19:35:05
You can also connect to a MSSQLServer/EXPRESS installation should you prefer.
This can create a SQLExpress container on your machine with the default ports exposed (1433). You can also connect to a database that is already installed. You will need to connect to this database using a tool like DBeaver using the following credentials:
Username: sa
Password: sXi_Pass (Or whatever is already configured for an existing installation)
To setup a MSSQL EXPRESS container follow these steps:
Create a directory on your machine E.g. dockerImgCfgs
Create a file called docker-compose.yml inside that directory and paste the following into it:
version: '3'

services:
  db01:
    image: mcr.microsoft.com/mssql/server:2017-latest
    container_name: xlayer-api-sqlexpress01
    hostname: xlayer-api-sqlexpress01
    networks:
      - sxiws_net
    ports:
      - 1433:1433
    volumes:
      # ===== Windows Host =====
      - C:\dockerImgCfgs\SQLEXPRESS01:/var/opt/mssql/data
    environment:
      - ACCEPT_EULA=Y
      - SA_PASSWORD=sXi_Pass
      - MSSQL_PID=Express

networks:
  sxiws_net:
    driver: bridge
Run the following to start your container
docker-compose upConnect to this database container and create a "sxirestapi" database.
Once the database is created you can start the XLayerAPI and it will create the relevant tables.
NOTE:
If you wish to get rid of the container that was launched simply run the following:
docker-compose downRemember to delete the DBs file system that will have been created in C:\dockerImgCfgs\SQLEXPRESS01
#29 Re: SXI Web Services » XLayer API v3.0 » 27-02-2020 12:13:20
If you want to play with this XLayerAPI really quickly and want a super fast database setup use docker and follow these steps. This will create a MySQL container on your machine with the default ports exposed (3306) as well as create a new database in MySQL called "sxirestapi". You should also be able to connect to this container using a tool like DBeaver using the following credentials:
Username: root
Password: sXi_Pass
To setup this container follow these steps:
Create a directory on your machine E.g. dockerImgCfgs
Create a file called docker-compose.yml inside that directory and paste the following into it:
version: '3'

services:
  db01:
    image: mysql:5.7.29
    container_name: xlayer-api-db01
    hostname: xlayer-api-db01
    networks:
      - sxiws_net
    ports:
      - 3306:3306
    volumes:
      # ===== Windows Host =====
      - C:\dockerImgCfgs\DB01:/var/lib/mysql
      - C:\dockerImgCfgs\my.cnf:/etc/mysql/my.cnf
      - C:\dockerImgCfgs\init.sql:/init.sql
      # ====== Linux Host ======
      #- ./dockerCfg/my.cnf:/etc/mysql/my.cnf
      #- ./dockerCfg/init.sql:/init.sql
      #- /opt/SXI/SXIDB:/var/lib/mysql
    environment:
      - MYSQL_DATABASE=mysql
      - MYSQL_ROOT_PASSWORD=sXi_Pass
    command:
      'mysqld --innodb-flush-method=fsync --init-file=/init.sql'

networks:
  sxiws_net:
    driver: bridge
In the same directory create a file called "init.sql" and paste the following into it:
CREATE DATABASE IF NOT EXISTS sxirestapi CHARACTER SET utf8 COLLATE utf8_general_ci;Also in the same directory create a my.cnf file and paste the following into it (you MAY need to go through this file and make adjustments specific to your machine althouhg I have keep things very generic so you shouldn't have to make changes):
# MariaDB/MySQL database server configuration file.
#
# You can copy this file to one of:
# - "/etc/mysql/my.cnf" to set global options,
# - "~/.my.cnf" to set user-specific options.
#
# One can use all long options that the program supports.
# Run program with --help to get a list of available options and with
# --print-defaults to see which it would actually understand and use.
#
# For explanations see
# http://dev.mysql.com/doc/mysql/en/server-system-variables.html

# This will be passed to all mysql clients
# It has been reported that passwords should be enclosed with ticks/quotes
# escpecially if they contain "#" chars...
# Remember to edit /etc/mysql/debian.cnf when changing the socket location.
[client]
port		= 3306
socket		= /var/run/mysqld/mysqld.sock

# Here is entries for some specific programs
# The following values assume you have at least 32M ram

# This was formally known as [safe_mysqld]. Both versions are currently parsed.
[mysqld_safe]
socket		= /var/run/mysqld/mysqld.sock
nice		= 0

[mysqld]
#
# * Basic Settings
#
#user		= mysql
pid-file	= /var/run/mysqld/mysqld.pid
socket		= /var/run/mysqld/mysqld.sock
port		= 3306
basedir		= /usr
datadir		= /var/lib/mysql
tmpdir		= /tmp
lc_messages_dir	= /usr/share/mysql
lc_messages	= en_US
skip-external-locking
#
# Instead of skip-networking the default is now to listen only on
# localhost which is more compatible and is not less secure.
bind-address		= 0.0.0.0
#
# * Fine Tuning
#
max_connections		= 100
connect_timeout		= 5
wait_timeout		= 600
max_allowed_packet	= 16M
thread_cache_size       = 128
sort_buffer_size	= 4M
bulk_insert_buffer_size	= 16M
tmp_table_size		= 32M
max_heap_table_size	= 32M
#
# * MyISAM
#
# This replaces the startup script and checks MyISAM tables if needed
# the first time they are touched. On error, make copy and try a repair.
myisam_recover_options = BACKUP
key_buffer_size		= 128M
#open-files-limit	= 2000
table_open_cache	= 400
myisam_sort_buffer_size	= 512M
concurrent_insert	= 2
read_buffer_size	= 2M
read_rnd_buffer_size	= 1M
#
# * Query Cache Configuration
#
# Cache only tiny result sets, so we can fit more in the query cache.
query_cache_limit		= 128K
query_cache_size		= 64M
# for more write intensive setups, set to DEMAND or OFF
#query_cache_type		= DEMAND
#
# * Logging and Replication
#
# Both location gets rotated by the cronjob.
# Be aware that this log type is a performance killer.
# As of 5.1 you can enable the log at runtime!
#general_log_file        = /var/log/mysql/mysql.log
#general_log             = 1
#
# Error logging goes to syslog due to /etc/mysql/conf.d/mysqld_safe_syslog.cnf.
#
# we do want to know about network errors and such
#log_warnings		= 2
#
# Enable the slow query log to see queries with especially long duration
#slow_query_log[={0|1}]
slow_query_log_file	= /var/log/mysql/mariadb-slow.log
long_query_time = 10
#log_slow_rate_limit	= 1000
#log_slow_verbosity	= query_plan

#log-queries-not-using-indexes
#log_slow_admin_statements
#
# The following can be used as easy to replay backup logs or for replication.
# note: if you are setting up a replication slave, see README.Debian about
#       other settings you may need to change.
#server-id		= 1
#report_host		= master1
#auto_increment_increment = 2
#auto_increment_offset	= 1
#log_bin			= /var/log/mysql/mariadb-bin
#log_bin_index		= /var/log/mysql/mariadb-bin.index
# not fab for performance, but safer
#sync_binlog		= 1
expire_logs_days	= 10
max_binlog_size         = 100M
# slaves
#relay_log		= /var/log/mysql/relay-bin
#relay_log_index	= /var/log/mysql/relay-bin.index
#relay_log_info_file	= /var/log/mysql/relay-bin.info
#log_slave_updates
#read_only
#
# If applications support it, this stricter sql_mode prevents some
# mistakes like inserting invalid dates etc.
#sql_mode		= NO_ENGINE_SUBSTITUTION,TRADITIONAL
#
# * InnoDB
#
# InnoDB is enabled by default with a 10MB datafile in /var/lib/mysql/.
# Read the manual for more InnoDB related options. There are many!
default_storage_engine	= InnoDB
# you can't just change log file size, requires special procedure
#innodb_log_file_size	= 50M
innodb_buffer_pool_size	= 256M
innodb_log_buffer_size	= 8M
innodb_file_per_table	= 1
innodb_open_files	= 400
innodb_io_capacity	= 400
innodb_flush_method	= O_DIRECT
#
# * Security Features
#
# Read the manual, too, if you want chroot!
# chroot = /var/lib/mysql/
#
# For generating SSL certificates I recommend the OpenSSL GUI "tinyca".
#
# ssl-ca=/etc/mysql/cacert.pem
# ssl-cert=/etc/mysql/server-cert.pem
# ssl-key=/etc/mysql/server-key.pem

#
# * Galera-related settings
#
[galera]
# Mandatory settings
#wsrep_on=ON
#wsrep_provider=
#wsrep_cluster_address=
#binlog_format=row
#default_storage_engine=InnoDB
#innodb_autoinc_lock_mode=2
#
# Allow server to accept connections on all interfaces.
#
bind-address=0.0.0.0
#
# Optional setting
#wsrep_slave_threads=1
#innodb_flush_log_at_trx_commit=0

[mysqldump]
quick
quote-names
max_allowed_packet	= 16M

[mysql]
#no-auto-rehash	# faster start of mysql but no tab completion

[isamchk]
key_buffer		= 16M

#
# * IMPORTANT: Additional settings that can override those from this file!
#   The files must end with '.cnf', otherwise they'll be ignored.
#
!include /etc/mysql/mariadb.cnf
!includedir /etc/mysql/conf.d/
Once you have these files created run the following:
docker-compose up
NOTE:
If you wish to get rid of the container that was launched simply run the following:
docker-compose downRemember to delete the DBs file system that will have been created in C:\dockerImgCfgs\DB01
#30 SXI Web Services » XLayer API v3.0 » 27-02-2020 11:51:56
- SeanR
- Replies: 2
There is a new XLayer endpoint (REST ONLY) that we can start using. This new XLayerAPI runs as a windows service and no longer relies on Tomcat being installed. You will need to download and install Java JDK 13.02.
XLayerAPI v3.0 can be downloaded from here.
This endpoint will write all payloads to a MYSQL\MariaDB database. It has both Asynchronous and Synchronous capabilities. Please check out the swagger documentation after you have installed it. the links can be found at the end of this pose
The included README.txt explains the following:
INSTALLATION
Follow the steps outlined below to get the XLayerAPI installed as a windows service.
Make sure you have Oracle Java JDK 13.02 installed (https://www.oracle.com/java/technologie … loads.html)
Unzip this archive to X:\SXI\XLayerAPI
Edit the XLayerAPI.xml configuration file that "spring.config.location" argument in the "arguments" element is pointing to the directory you extracted the archive to in the above step. (e.g. X:\SXI\XLayerAPI)
Open a command prompt as Administrator
Change directory to X:\SXI\XLayerAPI
Run the following: XLayerAPI.exe install
You can check in the "Services" Management Console that you now have a new Windows Service called "XLayerAPI".
CONFIGURATION
XLayerAPI sends all its transactions to a database. Depending on which database you use (either MySQL/MariaDB or MSSQL Server/Express)
Connect to the database and run the relevant init.sql script to create the database (|init_MYSQL.sql or init_MSSQL.sql)
NOTE: you do not need to create any tables as the XLayerAPI will automatically do this for you if they do not already exist.The default database is MySQL / MariaDB however should you wish to use a MSSQL or a MSSQLExpress database then comment out the configuration in the application.properties file
under the comment#=============================================================================== # MYSQL / MARIADB Database Settings # NOTE: # COMMENT OUT this configuration if you wish to use a MS database # (NB Make sure you uncomment the MSSQL settings below. #=============================================================================== spring.jpa.hibernate.ddl-auto=update spring.datasource.url=jdbc:mysql://${MYSQL_HOST:localhost}:3306/sxirestapi #spring.datasource.url=jdbc:mysql://db01:3306/sxirestapi spring.datasource.username=root spring.datasource.password=sXi_Passand uncomment the configuration under the comment
	#===============================================================================
	# MSSQL Server / SQLExpress Database Settings
	# NOTE:
	#   UNCOMMENT if you wish to use a MS database (NB Make sure you comment out the
	#   MySQL settings above.
	#===============================================================================
        #spring.jpa.hibernate.ddl-auto=update
        #spring.datasource.url=jdbc:sqlserver://localhost:1433;databaseName=sxirestapi
        #spring.datasource.username=sa
        #spring.datasource.password=sXi_Pass
        #spring.datasource.driverClassName=com.microsoft.sqlserver.jdbc.SQLServerDriver
        #spring.jpa.show-sql=true
Should you wish to change some of the default settings for XLayerAPI you can do so in the application.properties file.
NOTE: Once you have made changes to this file you will need to restart the application.
Other settings that should be checked are:
sync.transaction.timeout - This is the number of seconds the session will waid for a response before sending a failed message to the client. (Default 60 seconds)
server.port - This is the port that the XLayerAPI will listen on. (Default = 9788)
spring.datasource.url - The MYSQL connection string needed to connect to the "sxirestapi" database.
(Default = jdbc:mysql://${MYSQL_HOST:localhost}:3306/sxirestapi)
- or -
- The MSSQL connection string needed to connect to the "sxirestapi" database.
(Default = jdbc:sqlserver://localhost:1433;databaseName=sxirestapi)
If you want to use a different database name then simply change "sxirestapi" to the name you wish to use in the relevant init.sql file and in the connection string.
USEFUL LINKS
SWAGGER Documentation = https://localhost:9788/swagger-ui.html
Spring Management = https://localhost:9789/actuator
= https://localhost:9789/actuator/health
#31 Re: Event Management » Another way to handle DELAYs for events » 28-10-2019 15:19:06
Jobs in SQL Express
The functionality of creating SQL Agent Jobs is not available in SQL Server Express Edition. An alternative is to execute a batch file which executes a SQL script using Windows Task Scheduler.
In order to do this first create a batch file named sqljob.bat
sqlcmd -S servername -U username -P password -i path/of/sqljob.sqlReplace the servername, username, password and path with the relevant values.
Then create the SQL Script file named sqljob.sql
USE [databasename]
--T-SQL commands go here
GO
Replace the [databasename] with your database name. The USE and GO is necessary when you write the SQL script.
sqlcmd is a command line utility to execute SQL scripts. After creating these two files execute the batch file using Windows Task Scheduler set to run every minute.
#32 Re: Event Management » Another way to handle DELAYs for events » 23-10-2019 11:12:48
Add Delay events to MSSQL
We can delay events in MSSQL in a very similar fashion as what was describes in the original post. The steps to perform are as follows:
Make sure that SQL Server Agent(MSSQLSERVER) windows service is running.
In Microsoft SQL Server Management Studio expand the SQL Server Agent option at the very bottom of the "Object Explorer" pane.
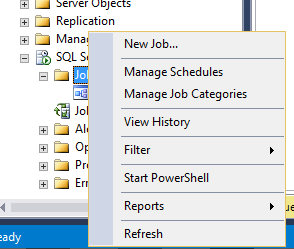
Right Click on Jobs and select New Job... from the dropdown menu
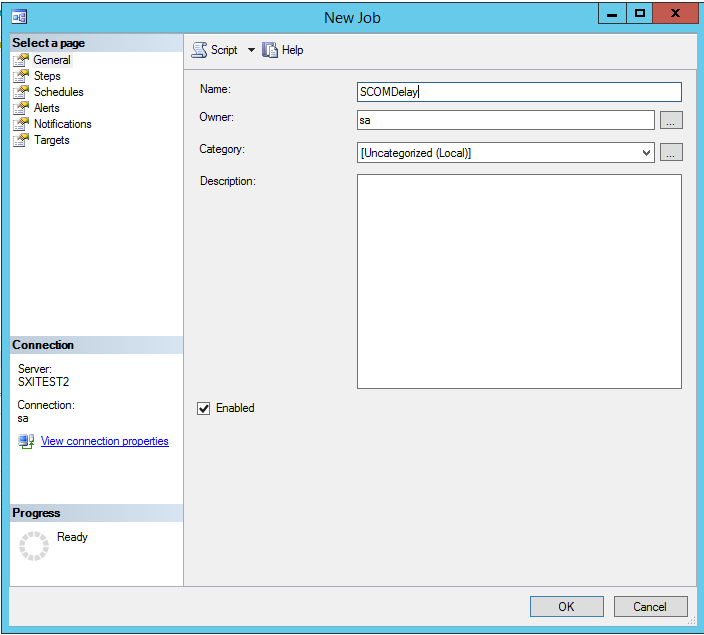
The following window will appear. Give your new Job a Name (E.g. SCOMDelay) - You can include a description at this point as well if required.
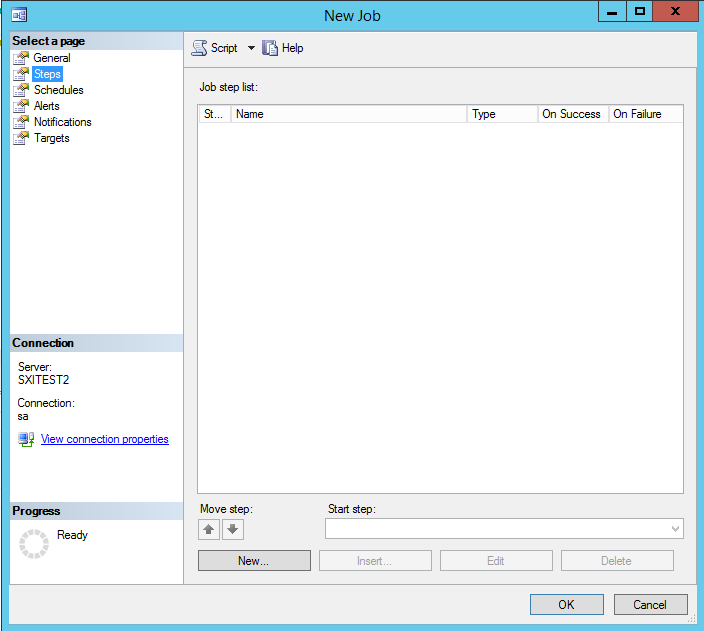
Next, Click on the Steps Page (in the top left panel) and then Click on the 'New' button at the bottom of the window.
In the 'New Job Step' window Provide a 'Step Name' (E.g. CheckDelay). NOTE: Make sure you select the correct database from the 'Database:' dropdown menu. In the Command textarea paste the following:
UPDATE sigreg SET procFlag = '0'
WHERE procFlag = '999'
AND (SELECT DATEADD(minute, 5, epochTime)) < GETDATE();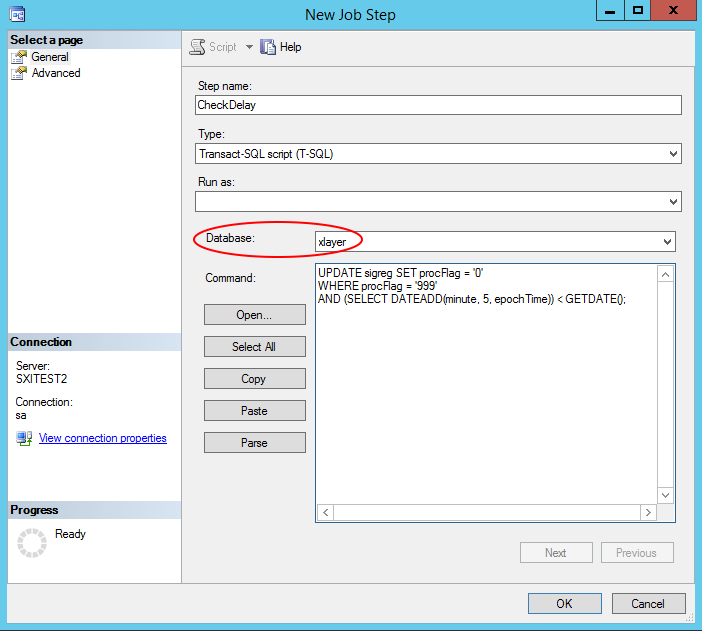
NOTE: this code uses a 5 min delay, however, you can change that to any number of minutes you require.
Then Click on 'OK' - You will be taken back to the 'New Job' windowNow select the 'Schedules' Page (in the top left panel) abd Click on the 'New' button at the bottom of the window. A 'New Job Schedule' window will popup.
Give this new schedule a 'Name' (E.g. SCOMDelaySchedule)
Make sure you Select Frequency to 'Daily'
Under 'Daily Frequency' Click the 'Occurs every:' radio button and change the drop down menu from 'Hour(s)' to 'Minute(s)'
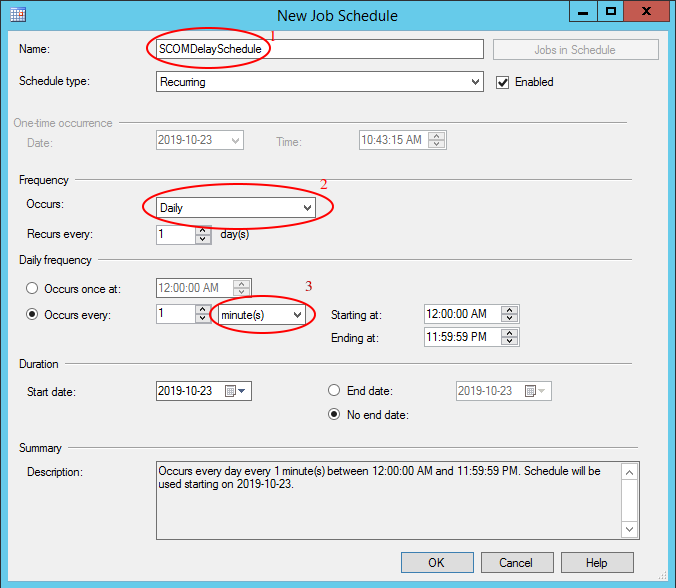
Then Click on 'OK'Nothing further NEEDS to be done however should you wish to add Alerts or Notifications you can. These can also be added at a later time as well.
You should now see the Job you just created under the 'Jobs' menu which is under 'SQL Server Agent'.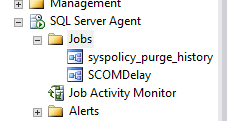
Should you wish to check the status of your Job and when it will run again (as well as what the Last Outcome was for the last time you job ran) you can open the 'Job Activity Monitor' window.
#33 Re: Event Management » Another way to handle DELAYs for events » 22-10-2019 18:50:55
So what should happen if the X-DEC we received has a 'Repaired' state in it?
Well I think we have one of 2 options that we need to test in a busy environment:
We could simply change the sigreg record's 'processedFlag' to 1. That way the 2nd contract would never process that record.
We could delete the record from the sigreg if the 'processedFlag' is still '999'. This will not cause X-ServiceBroker to crash as the 2nd contract will never read that record in the first place.
#34 Event Management » Another way to handle DELAYs for events » 22-10-2019 18:36:54
- SeanR
- Replies: 3
We currently have a very convoluted way to handle the processing of delays on events that are sent to us from an EMS system which involves 2 database tables and writing and later deleting signal registry records etc etc.
A delay process can EASILY be accomplished using MSSQL JOBS or MYSQL Events. At this point I have only tested this in MYSQL (I will post follow up on how to create MSSQL Jobs in a future comment)
The theory behind this method is as follows:
A first contract reads the X-DEC file which is sent to us from the EMS tool.
This first contract simply writes a record into the signal registry (if the state is not Repaired). However, it writes the record with a 'processedflag' value of something other than 0,1 or 2 (Let's use 999 in this example)
A second contract only processes this signal registry. It is configured to only process records with a 'processedflag' of '0'
We create a MYSQL Event that will run every minute. When this event runs it will check all the records in the signal registry that have a 'processedflag' of '999' and that are older than the records 'epochtime' plus a specified delay interval.
On finding a matching record it will change this 'processedflag' to '0' so that the second contract can process it.
To create the MYSQL Event to the following:
Enable the MYSQL Event_Scheduler
set global event_scheduler = on;Create an Event which will run every minute.
CREATE EVENT scomdelay
ON SCHEDULE EVERY 1 MINUTE
DO
  update sigreg set processedflag = 0 where processedflag = '999' and (select Date_add(epochtime, interval 5 minute)) < now();
The above will simply run the update query every minute. When the delay has expired (in the code example above we are delaying for 5 minutes) the record will be updates setting it's processedflag to 0.
NOTE: you can create multiple MYSQL Events for different 'actionName' in the signal registry simply by changing the update line in the above code block.
E.G.
update sigreg set processedflag = 0 where processedflag = '999' and actionName = 'ACME_Create' and (select Date_add(epochtime, interval 5 minute)) < now();In this above example ONLY records that have the 'actionName' of 'Acme_Create' and a 'processedflag' of '999' will be modified.
To check if your Event has been added correctly to can run:
show processlist;which will show you the process 'User' as event_scheduler. If you do not see your event in that list simply run the
set global event_scheduler = on;command again.
#35 Re: SXI Web Services » SXIWebServices-2.3 (Writing to a database) in Docker » 17-10-2019 07:55:21
Remember if you get the
http: server gave HTTP response to HTTPS clienterror you need to perform the following:
Go to docker settings on your local machine and perform the following:
For Windows go to docker settings and on the "Daemon" tab click on the advanced toggle switch and add the following to the json given:
"insecure-registries": ["xlayer.co.za:5000"]For Linux edit the "daemon.json" file. The default location is "/etc/docker/daemon.json". (If the file cannot be found, create it.) then add the following code:
{
  "insecure-registries" : ["xlayer.co.za:5000"]
}
#36 SXI Web Services » SXIWebServices-2.3 (Writing to a database) in Docker » 16-10-2019 16:45:23
- SeanR
- Replies: 1
In order to run the SXIWebservices that write to a database we need to make use of 2 containers. One for the actual web services and another for the database. The database we are using in this instance is MariaDB which is actually just MYSQL.
You will need to create a file called docker-compose.yml inside this file add the code below:
version: '3'

services:
    ws:
        image: xlayer.co.za:5000/sxiws:2.3
        container_name: sxiws
        ports:
            - 8080:8080
        networks:
            - sxiws_net
        volumes:
            # ===== Windows Host =====
            - C:/SXI/XPress/XmlOut:/opt/SXI/XPress/XmlOut
            - C:/SXI/WebServiceLogs:/opt/SXI/WebServiceLogs
            # ====== Linux Host ======
            #- /opt/SXI/XPress/XmlOut:/opt/SXI/XPress/XmlOut
            #- /opt/SXI/WebServiceLogs:/opt/SXI/WebServiceLogs

    db:
        image: xlayer.co.za:5000/sxiwsdb:2.3
        container_name: sxiwsdb
        ports:
            - 3306:3306
        networks:
            - sxiws_net
        volumes:
            # ===== Windows Host =====
            - C:/SXI/SXIDB:/var/lib/mysql
            # ====== Linux Host ======
            #- /opt/SXI/SXIDB:/var/lib/mysql
        command:
            'mysqld --innodb-flush-method=fsync'

networks:
    sxiws_net:
        driver: bridge
NB: Remember to comment the Windows paths and uncomment the unix paths if you are running on Linux.
Now that you have the docker-compose.yml file all you have to do is run the following from a command line in the directory where you saved file you created:
docker-compose upNote: If this is the first time you are running this command it will download the images you need and then will set them up for you. (I.e. it will create the relevant database, tables and users you need) This can take up to 3 mins after the download is complete.
You should now be able to browse to http://localhost:8080/SXIWebServices-2.3
To test you can use SoapUI to send SOAP or REST transactions to the SXI web services. To see the transactions in the database you will need to connect something like DBeaver or MYSQLWorkbenchto the "sxiwsdb" container.
To get the docker IP of the "sxiwsdb" container run the following command and look for the IPAddress tag:
docker inspect sxiwsdbOnce you have the ip address you can connect using port 3306 with the username of 'sxi'. The password is a common SXI password however will not be published here.
Note: This image by default will not write XML files to the filesystem. However, with some simple configuration this can be achieved. For now though you are welcome to download and install the 2.1 image which can run concurrently with 2.3 as long as the ports are changed.
#37 Utils and Useful little tools » Standalone Mail server for windows » 22-08-2019 18:18:02
- SeanR
- Replies: 0
While looking for a SMTP relay server that we can install and use to forward emails from X-EventCollector as though they come from the original user I came across MailEnable
I think we need to look at how we can limit the SMTP Relay so as not to become a SPAM house within our clients. However I have tested this and it does work well for the "Mitel" BCX Messaging requirement.
I would be REALLY interested to see if anybody else come up with other suggestions.
Sendgrid while good blocks many emails without any explanation.
#38 Re: General Discussion » Blueprints » 15-08-2019 16:50:44
The blueprint for FreshDesk Service Desk has been created.
You can find the required files in the SXI Blueprints Repo.
This points to a Demo SXI Freshdesh service desk system that you can find here. More details can be found in the Readme.txt file.
#39 Re: General Discussion » Blueprints » 14-08-2019 17:25:07
The blueprint for JIRA Service Desk has been created.
You can find the required files in the SXI Blueprints Repo.
This points to a Demo Jira service desk system that you can download and install on your machine. Instructions can be found in the Readme.txt file.
#40 General Discussion » Blueprints » 02-08-2019 19:03:31
- SeanR
- Replies: 2
We have started building XLayer Blueprints.
These are going to be simple examples of how do perform certain functions in XLayer when integrating to 3rd party systems.
You can find the Blueprints here at the SXI Blueprints repo.
The first Blueprint that has been made available is for Service Now using the currently available Service Now development instance https://dev85728.service-now.com/
#41 Utils and Useful little tools » Visio Type Tool (Yed / Draw.io) » 18-07-2019 11:38:24
- SeanR
- Replies: 1
If you are looking for something to create Visio type documents for architectural diagrams have a look at a downloadable tool called
Yed - https://www.yworks.com/products/yed
or an online tool
Draw.io - https://www.draw.io/
#42 HOWTOS » X-EventCollector ReadNewOnly Does not work » 27-03-2019 09:00:29
- SeanR
- Replies: 1
If we set the following configuration in the X-EventCollector Connector section:
<sxi:ReadNewOnly>Yes</sxi:ReadNewOnly>what we see is that X-EventCollector hangs. However if you look in the X:\SXI\X-EventCollector\bin directory you will see an error.log file. The top line will look something like this:
java.security.AccessControlException: access denied org.apache.derby.security.SystemPermission( "engine", "usederbyinternals" )
To address this issue edit the java.policy file which can be found in the C:\SXI\jre\lib\security directory.
Add the following line to the bottom of the grant { section.
permission org.apache.derby.security.SystemPermission "engine", "usederbyinternals";
Your policy file should end looking something like this:
        permission java.util.PropertyPermission "java.vm.vendor", "read";
        permission java.util.PropertyPermission "java.vm.name", "read";

	permission org.apache.derby.security.SystemPermission "engine", "usederbyinternals";
};#43 Re: HOWTOS » Padding Zeros to a Field with XSLT » 08-03-2019 12:03:15
Is there a reason this is not being done with a standard XLayer rule?
Given a field called "aNum" that contains "12345" The following XLayer rule will product "0000012345"
<sxi:Rules>
    <sxi:SubStringReplace>
        <sxi:StartAt>-1</sxi:StartAt>
        <sxi:Pattern>0000000000</sxi:Pattern>
        <sxi:ReplaceWith input="yes">aNum</sxi:ReplaceWith>
    </sxi:SubStringReplace>
</sxi:Rules>
No need to stylesheet Kung-Fu. Unless obviously you absolutely have to do it in a stylesheet.
#44 Utils and Useful little tools » Transmitting Files over http » 07-03-2019 08:41:40
- SeanR
- Replies: 0
Some files are blocked by email. E.g. Google does not like to send exe files. The only way to send the file is via FTP or a html download page.
Now we can try this
You can upload your file and sent the link via email. You will get notified when the other person has downloaded the files you were sharing.
Nice and really simple.
#45 General Discussion » XLayer Mappings or Stored Proc? » 26-02-2019 23:45:16
- SeanR
- Replies: 0
This really only applies if we have access to create a stored proc on a database.
The question si a matter of style and maintainability.
Often times we need to check if a record exists in a table. If it exists we need to use that records ID however if there is no record in the table then we need to insert it and return the ID of the newly inserted record.
Assume we have a table called locations the table is made up of the following columns.
id
location
address
Let's look at 2 ways to do this.
Using XLayer Mappings
We start of by collecting the location and address from the source trigger (not discussed here)
Consider the following Configuration (without extensive exception handling) to check if the record exists and insert it if it doesn't.
<!-- Check if Location already exists --> <Collect dataDefinition="GetID" connectorId="MYSQLCon" source="locations" lookupField="location" lookupValue="mLocation"> <Conditions> <Condition> <When value="false"> <LogComment Comment="A record could NOT be found ... I will perform an insert now!"/> <!-- Perform the INSERT here but then I need to get the ID later --> <Create dataDefinition="InsertLocation" connectorId="MYSQLCon" source="locations"> <Conditions> <Condition> <When value="True"> <Collect dataDefinition="GetID" connectorId="MYSQLCon" source="locations" lookupField="location" lookupValue="mLocation"> <Conditions> <Condition> <When field="mId" operator="Matches" value="^\d*$"> <LogComment Comment="The ID that was returned is >~#~mId~#~<"/> </When> <Otherwise> <LogComment Comment="Exception Handling stuff to go here."/> </Otherwise> </Condition> </Conditions> </Collect> </When> <Otherwise> <LogComment Comment="Exception Handling stuff to go here."/> </Otherwise> </Condition> </Conditions> </Create> </When> <Otherwise> <LogComment Comment="The record exists ID = >~#~mId~#~<"/> </Otherwise> </Condition> </Conditions> </Collect>This is cumbersome as we need to do the select (Collection of the ID field) twice. If the record does not exist in the table which we test by doing the first Collect we insert the record using a Create and then have to do the same Collect again to get the newly created records ID.
The next issue is that for every mapping we should be doing exception handling.
Using a SQL Stored Procedure
This XLayer configuration calls a stored procedure. As you can see the configuration is far simpler and cleaner.
<Collect connectorId="MYSQLCon" source="locations" lookupField="na" lookupValue="" customQuery="call CheckLocations("~#~mLocation~#~", "~#~mAddress~#~");"> <Conditions> <Condition> <When value="true"> <LogComment Comment="The ID that was returned is >~#~mId~#~<"/> </When> <Otherwise> <LogComment Comment="Exception Handling stuff to go here."/> </Otherwise> </Condition> </Conditions> </Collect>The stored proc that we create in MYSQL looks as follows:
CREATE DEFINER=`root`@`localhost` PROCEDURE `CheckLocations`(
	in sLocation varchar(100),
    in sAddress varchar(255)
)
BEGIN
	IF (SELECT 1 = 1 FROM locations WHERE location = sLocation) THEN
		BEGIN
			SELECT id FROM locations WHERE location = sLocation;
		END;
	ELSE
		BEGIN
			INSERT INTO locations (location, address) VALUES(sLocation, sAddress);
			SELECT LAST_INSERT_ID() AS id;
		END;
	END IF;
END
As you can see this looks far more elegant and straight forward to maintain.
Let me know your thoughts on this strategy. As mentioned at the outset this can only be done if we have access to create a stored procedure on the database. However this does offer some interesting options going forward should we need to validate or obtain supporting data.
#46 Re: HOWTOS » Elastic Stack » 08-02-2019 10:14:55
Metricbeat Installation and Configuration
Basic configuration files can be found in the SXI Github Repository
Metricbeat is use to send System metrics about the host where it is installed to an Elasticsearch server. Metrics can be sent to Elasticsearch directly or through logstash.
Download MetricBeats from here and extract it to x:\SXI\Dashboard\metrics (this directory is not critical though as this can be installed anywhere)
Before installing metricbeat edit the install-service-metricbeat.ps1 and replace the service name with something more meaningful. E.g. "X-ServerMonitor"
To install the service open "PowerShell" as administrator and run the following:
powershell -ExecutionPolicy ByPass -File install-service-metricbeat.ps1you should see the message that "X-ServerMonitor" was successfully installed.
Next run
.\metricbeat.exe modules enable systemwhich enables the operating system metrics to be collected. there are a number of additional modules that whose explanation is beyond the scope of this post.
Running this:
.\metricbeat.exe setup -ewill send the default dashboard and visualizations to Kibana.
#47 HOWTOS » Example Database Queries - Including using a Stored Procedure » 07-02-2019 19:36:00
- SeanR
- Replies: 0
Prerequisits:
SQLExpress
SQL Management Studio
XLayer 2.0+
An XML editor will make life a whole lot easier.
This is a simple explanation of how to use XLayer to connect to a database, insert a record and later retrieve a record, firstly using a straight forward XLayer DataDefinition then executing a stored procedure. We will use XML files to trigger the XLayer Workflows.
NOTE:The scripts, trigger XML files and configuration can all be found in the SXI GitHub repository.
To start with let us prepare the database. Connect to the SQLExpress RDBMS using SQL Management Studio and run the following (or use BuildDB.sql from the github repo):
USE [master]

CREATE DATABASE dummyContacts
GO

CREATE TABLE dummyContacts.dbo.people (
	personID int NOT NULL IDENTITY(1,1),
	firstName varchar(100),
	lastName varchar(100),
	age int,
	mobileNum bigint
)
GO

INSERT INTO dummyContacts.dbo.people (lastName, firstName, age, mobileNum) VALUES ('Flintstone', 'Fred', 5214, 27823334444)
GO
This will create a database called 'dummyContacts' with a table called 'people' and will insert an initial record for 'Fred Flintstone'.
Common Configuration that will be used for all example operations described here
Open the XLayer initialization.xml file and add the following configuration into the Workflows section:
<Workflow name="SXI_DB_Example">
	<Connector>XML</Connector>
	<Connector>MSSQL</Connector>
</Workflow>
We will be adding the configuration for all examples into one configuration file called SXI_DB_Example.xml
Start the X-ServiceBroker service now. A skeleton template will be created for you. This new configuration file can be found in thex:\SXI\X-ServiceBroker\xml\plugins\workflows directory.
Open the SXI_DB_Example.xml configuration file and change the Logging Level configuration from INFORMATION to TRACE
Next configure the XML Connector as follows:
<Connector id="XMLFileSystemConnector" type="XML">
	<Connection xsi:type="sxi:XML">
		<sxi:RetryDelay>60</sxi:RetryDelay>
	</Connection>
	<sxi:ReturnCodes>
		<sxi:Success>
			<sxi:Code>Success Code</sxi:Code>
		</sxi:Success>
		<sxi:RecoverableError>
			<sxi:Code>^.*FWK005.*$</sxi:Code>
		</sxi:RecoverableError>
	</sxi:ReturnCodes>
</Connector>
Next we need to configure the connection to the database. I have created a user on my database called 'sxi' with a password of 'qwerty'. Please change these values in the connector to the username and password relevant to your database installation. (Remember: you may need to enable TCP connections to SQLExpress)
<Connector id="MSSQLDBConnector" type="DB">
	<Connection xsi:type="sxi:MSSQL">
		<sxi:Server>localhost</sxi:Server>
		<sxi:User>sxi</sxi:User>
		<sxi:Password>qwerty</sxi:Password>
		<sxi:RetryDelay>30</sxi:RetryDelay>
		<sxi:DBName>dummyContacts</sxi:DBName>
		<sxi:Port>1433</sxi:Port>
	</Connection>
	<sxi:ReturnCodes>
		<sxi:Success />
		<sxi:RecoverableError>
			<sxi:Code>.+Read timed out.+</sxi:Code>
			<sxi:Code>.*Invalid state.+</sxi:Code>
			<sxi:Code>.*SHUTDOWN is in progress.+</sxi:Code>
			<sxi:Code>I/O Error: Connection reset by peer: socket write error</sxi:Code>
		</sxi:RecoverableError>
	</sxi:ReturnCodes>
</Connector>
Notice that the DBName to use is 'dummyContacts', the database we created earlier.
Next we need to configure X-ServiceBroker to listen for a "Trigger". We configure this in the SignalRegistry section of the SXI_DB_Example.xml file. We will be listening for the existance of a XML file that we will copy into the x:\SXI\XPress\XmlOut directory to start the process. (These XML Trigger files can all be found in the SXI GitHub Repo under the XMLTriggers directory). The configuration will look as follows:
<SignalRegistry xsi:type="sxi:SigReg.XML">
	<sxi:ConnectorID>XMLFileSystemConnector</sxi:ConnectorID>
	<sxi:FolderPath>../../XPress/XmlOut</sxi:FolderPath>
	<sxi:ActionElement>//*[local-name()='Action']</sxi:ActionElement>
	<sxi:FileName>^XLayerDB_.*\.xml</sxi:FileName>
	<sxi:PollingDelay>1</sxi:PollingDelay>
	<sxi:DeleteProcessed>yes</sxi:DeleteProcessed>
</SignalRegistry>
When a XML file called XLayerDB_*.xml is found in the x:\SXI\XPress\XmlOut directory (defined in the sxi:FolderPath element) we will look at the Action field (in the triggered document) to determine which part of the Workflow to run. We define where to find the 'Action' field using the XML wildcard convention //*[local-name()='Action']. "Action" is the element in any XLayerDB_*.xml xml file which tells us what 'Action' in the SXI_DB_Example.xml configuration file needs to be called.
Inserting a new record
Create a XML file to trigger the relevant XLayer workflow. Call the file XLayerDB_Insert.xml and put the following into it:
<?xml version="1.0" encoding="iso-8859-1"?>
<root>
	<Action>Insert</Action>
	<Surname>Rubble</Surname>
	<Firstname>Barney</Firstname>
	<Age>5187</Age>
</root>
(Or copy it from here)
when this file is copied into the x:\SXI\XPress\XmlOut directory we want X-ServiceBroker to read the information inside it, and insert a new record into the DB. Remember: We configured the connection to the DB earlier.We now need to define an 'Action' that corresponds the the action that was read from the trigger document, in this case 'Insert'. We do this with the following configuration that we add to the Actions section of the configuration found in the SXI_DB_Example.xml config file:
<!-- This will simply insert a new contact into the 'people' table -->
    <Action name="Insert">
      <Mappings>
        <Collect dataDefinition="WhichContactToCreate" connectorId="XMLFileConnector" lookupField="entryid" lookupValue="" source="../../XPress/XmlOut" />
        <LogComment Comment=" ========== About to create the following into the 'people' table ========== "/>
        <OutputMemoryToLog/>
        <Create dataDefinition="InsertPerson" connectorId="MSSQLDBConnector" source="people">
          <Conditions>
            <Condition>
              <When value="True">
                <LogComment Comment=" ========== Successfully Created a 'people' record for ~#~mFirstname~#~ ~#~mSurname~#~ ========== "/>
              </When>
            </Condition>
          </Conditions>
        </Create>
      </Mappings>
    </Action>
Lets Break this down a bit. The first thing we need to do is Collect the data we want to insert as a new record. The 'Collect' mapping will look as follows:
<Collect dataDefinition="WhichContactToCreate" connectorId="XMLFileConnector" lookupField="entryid" lookupValue="" source="../../XPress/XmlOut" />There are a number of attributes that we need to define for this mapping. These will determine what we are going to collect from where.
dataDefinition: The dataDefinition "WhichContactToCreate" still needs to be configured, however this will define which elements we need to read from the XML file.
connectorId: This tells X-ServiceBroker which connector to use to collect the data (In this case we are using the XML Connector as we are reading the data from the XML file).
lookupField: Defines the name of the field in the Table which will contain the value defined in the lookupValue attribute. The lookupField lookupValue combination is typically used to build the 'where' part of a select statement. However it is not needed when reading a file. If this field cannot be found then the EntryID which was found by the Signal Registry will be used. In the case of a XML Connector this will be the file name. No extra configuration needs to be done here.
lookupValue: This is not needed for this collect and will be explained further when we discuss collecting a record from the database.
source: As this mapping is using a file system connector 'source' here refers to a directory where the file can be found. (This is done because you may want to collect data from a file that is not the trigger file) Please see the documentation on processing files for more information on this.
We now need to configure which fields in the XML file we want to collect (Remember: this is the file defined in the Collect mapping's 'lookupField' attribute - This happens to be the same file as the trigger file, however it does not have to be). The fields we want to collect are defined in the 'dataDefinition' we configured in the Collect mapping. Here we need a dataDefinition called 'WhichContactToCreate'
In the '<sxi:DataDefinitions>' section, create a new DataDefinition which looks as follows:
<!-- Get values from the XML file that we will inout into the database -->
<sxi:DataDefinition name="WhichContactToCreate">
	<sxi:Fields>
		<sxi:Field name="//*[local-name()='Surname']">
			<sxi:Rules />
			<sxi:OutputField>mSurname</sxi:OutputField>
		</sxi:Field>
		<sxi:Field name="//*[local-name()='Firstname']">
			<sxi:Rules />
			<sxi:OutputField>mFirstname</sxi:OutputField>
		</sxi:Field>
		<sxi:Field name="//*[local-name()='Age']">
			<sxi:Rules />
			<sxi:OutputField>mAge</sxi:OutputField>
		</sxi:Field>
		<sxi:Field name="//*[local-name()='MobileNum']">
			<sxi:Rules>
				<sxi:Default>999</sxi:Default>
			</sxi:Rules>
			<sxi:OutputField>mMobileNum</sxi:OutputField>
		</sxi:Field>
	</sxi:Fields>
</sxi:DataDefinition>
Notice how we use the XML wildcard to define the field we want to collect (an XPath can be used here as well). The output field is the name of the element in memory that will hold the data that was collected.
One more thing to notice in the above dataDefinition is that when collecting the MobileNum field from the XML document that we have added a 'Rule' so that if the MobileNum element cannot be found we will pout a default value of '999' in the mMobileNum field in memory.
The following 'LogComment' mapping simply addes a line into the log file.
========== About to create the following into the 'people' table ==========We can check what we have collected (I.e. the object in memory) by using a 'OutputMemoryToLog' mapping.
To insert the values we have collected we need to perform a 'Create' mapping. This mapping will look as follows:
<Create dataDefinition="InsertPerson" connectorId="MSSQLDBConnector" source="people"></Create>The attributes that we need to define for this mapping will determine what and how we are going to insert.
dataDefinition: This defines the fields in memory that we want to insert into the database table, we will se this in more detail shortly.
connectorId: This tells X-ServiceBroker which connector to use to insert the data (in this case we are using the MSSQLDBConnector which we configured earlier).
source: This tells XLayer which table to insert the record into.
In the '<sxi:DataDefinitions>' section, create a new DataDefinition which looks as follows:
<!-- Get values from the XML file that we will inout into the database -->
<sxi:DataDefinition name="InsertPerson">
	<sxi:Fields>
		<sxi:Field name="mSurname">
			<sxi:OutputField>lastName</sxi:OutputField>
		</sxi:Field>
		<sxi:Field name="mFirstname">
			<sxi:OutputField>firstName</sxi:OutputField>
		</sxi:Field>
		<sxi:Field name="mAge">
			<sxi:OutputField>age</sxi:OutputField>
		</sxi:Field>
		<sxi:Field name="mMobileNum">
			<sxi:OutputField>mobileNum</sxi:OutputField>
		</sxi:Field>
	</sxi:Fields>
</sxi:DataDefinition>
The 'Conditions' part of the mapping simply logs a comment if the record was successfully inserted. Please see 'Catching Expections' for more information on exception handling relating to the DB Connector.
Now if you check the database table you should see that there is a new record in the 'people' table for "Barney Rubble"
Basically the above config will perform the following SQL query:
INSERT INTO people ( [lastName] , [firstName] , [age] , [mobileNum] ) VALUES ( 'Rubble' , 'Barney' , '5187' , '999' )
Collect a Record using only a DataDefinition
Let's create a trigger xml file called XLayerDB_GetPerson.xml and put the following into it:
<?xml version="1.0" encoding="iso-8859-1"?>
<root>
	<Action>GetPerson</Action>
	<Surname>Flintstone</Surname>
</root>
(Or copy it from here)
When we copy this to the directory that is being monitored by the Signal Registry (../../XPress/XmlOut in this configuration) we want X-ServiceBroker to SELECT the record from the database WHERE the 'lastName' matches "Flintstone" and return that record to us.The following config describes the 'GetPerson' Action which we will now explain:
<!-- In this action we will collect the contact from the database with the last name found in the xml trigger file -->
<Action name="GetPerson">
	<Mappings>
		<Collect dataDefinition="WhichContactToGet" connectorId="XMLFileConnector" lookupField="entryid" lookupValue="" source="../../XPress/XmlOut" />
		<LogComment Comment=" ========== The following is what we collected from the XML Trigger file ========== "/>
		<OutputMemoryToLog/>
		<LogComment Comment=" ========== We will now collect the Contacts other information from the database ========== "/>
		<Collect connectorId="MSSQLDBConnector" source="people" lookupField="lastName" lookupValue="mSurname">
			<Conditions>
				<Condition>
					<When field="lastName" operator="Matches" value=".*">
						<LogComment Comment=" ========== We found a record for ~#~mSurname~#~ ========== "/>
						<OutputMemoryToLog/>
					</When>
					<Otherwise>
						<LogComment Comment=" ========== No contact exists for  ~#~mSurname~#~ ========== "/>
					</Otherwise>
				</Condition>
			</Conditions>
		</Collect>
	</Mappings>
</Action>
We need to Collect the data from the XML file in order to retrieve the Surname that must be used in the SELECT query to identify which record to return.
The 'Collect' mapping will look as follows:
<Collect dataDefinition="WhichContactToGet" connectorId="XMLFileConnector" lookupField="entryid" lookupValue="" source="../../XPress/XmlOut" />There are a number of attributes that we need to define for this mapping. These will determine what we are going to collect from where.
dataDefinition: The dataDefinition "WhichContactToGet" still needs to be configured, however this will define which field contains the Surname we need for our SQL query.
connectorId: This tells X-ServiceBroker which connector to use to collect the data (In this case we are using the XML Connector as we are reading the data from the XML file).
lookupField: Defines the name of the field in the Table which will contain the value defined in the lookupValue attribute. The lookupField lookupValue combination is typically used to build the 'where' part of a select statement. However it is not needed when reading a file. If this field cannot be found then the EntryID which was found by the Signal Registry will be used. In the case of a XML Connector this will be the file name. No extra configuration needs to be done here.
lookupValue: This is not needed for this collect and will be explained further when we discuss collecting a record from the database.
source: As this mapping is using a file system connector 'source' here refers to a directory where the file can be found. (This is done because you may want to collect data from a file that is not the trigger file) Please see the documentation on processing files for more information on this.
In the '<sxi:DataDefinitions>' section, create a new DataDefinition which looks as follows:
<!-- Use this datadefinition to get the Surname from the file which we will query the database for -->
<sxi:DataDefinition name="WhichContactToGet">
	<sxi:Fields>
		<sxi:Field name="//*[local-name()='Surname']">
			<sxi:Rules />
			<sxi:OutputField>mSurname</sxi:OutputField>
		</sxi:Field>
	</sxi:Fields>
</sxi:DataDefinition>
Notice how we use the XML wildcard to define the field we want to collect (an XPath can be used here as well). The output field is the name of the element in memory that will hold the data that was collected.
The following 'LogComment' mapping simply addes a line into the log file.
========== The following is what we collected from the XML Trigger file ==========We can check what we have collected (I.e. the object in memory) by using a 'OutputMemoryToLog' mapping.
We can now perform another 'Collect' to actually fetch the record from the database.
This 'Collect' could look as follows:
<Collect connectorId="MSSQLDBConnector" source="people" lookupField="lastName" lookupValue="mSurname">
	<Conditions>
		<Condition>
			<When field="lastName" operator="Matches" value=".*">
				<LogComment Comment=" ========== We found a record for ~#~mSurname~#~ ========== "/>
				<OutputMemoryToLog/>
			</When>
			<Otherwise>
				<LogComment Comment=" ========== No contact exists for ~#~mSurname~#~ ========== "/>
			</Otherwise>
		</Condition>
	</Conditions>
</Collect>
The Collect part of this configuration uses certain attributes to define what to collect
<Collect connectorId="MSSQLDBConnector" lookupField="lastName" lookupValue="mSurname" source="people" >
...
</Collect>
Notice that there is NO dataDefinition defined. This will effectively collect all fields for the record we are looking for. This is like performing a SELECT * ... SQL query
connectorId: This tells X-ServiceBroker which connector to use to insert the data (in this case we are using the MSSQLDBConnector which we configured earlier).
lookupField: Defines the name of the field in the Table which will contain the value defined in the lookupValue attribute. In this example we want to select a record where the 'lastName' column contains the Surname that we retreived from the XML file earlier. The lookupField lookupValue combination is typically used to build the 'where' part of a select statement.
lookupValue: The field name from the data in memory whose value will be passed to the configured lookupField. in this example we are pointing to the 'mSurname' field in memory. This was the field we collected earlier from the xml file.
source: The name of the table in the database where we will fetch the matching record from.
This Collect mapping builds the following SQL query:
SELECT * FROM 'source' WHERE lookupField = 'lookupValue'
SELECT * FROM people WHERE lastName = 'Flintstone'
The 'Conditions' part of the mapping simply logs a comment if the record was successfully found and thereafter prints the object in memory, which contains the data from the record that was retrieved,to the logfile. 'Otherwise' a different message is written to the logfile if the Surname, provided in the trigger XML file, was not found. Please see 'Catching Expections' for more information on exception handling relating to the DB Connector.
Collect a Record using a Stored Procedure
Firstly we need to have a stored procedure to call. For this example we will create a VERY simple stored proc that will perform exactally the same query as in the previous example.
To do this connect to the SQLExpress RDBMS using SQL Management Studio and run the following in a 'New Query' window:
CREATE PROCEDURE GetPersonDetails @lastName varchar(100)
AS
SELECT * FROM people where lastName = @lastname
This creates a stored proc called 'GetPersonDetails' and accepts a parameter '@lastName'
This can be tested by running this in a query window SSMS
exec GetPersonDetails @lastName = 'Flintstone'This should return the following:
personID | firstName | lastName    | age   | mobileNum
  1      |  Fred     |  Flintstone |  5214 |  27823334444
If you see the above result you know the stored proc is working.
Let's create a trigger xml file called XLayerDB_GetPersonUsingStoredProc.xml and put the following into it:
<?xml version="1.0" encoding="iso-8859-1"?>
<root>
    <Action>GetPersonUsingStoredProc</Action>
    <Surname>Flintstone</Surname>
</root>
NOTE: the configuration is almost identicle to the previous example. In fact you can even use the same datadefinitions. Below is the Action for 'GetPersonUsingStoredProc'
<!-- In this action we will collect the contact from the database with the last name found in the xml trigger file using a Stored Proc-->
    <Action name="GetPersonUsingStoredProc">
      <Mappings>
        <Collect dataDefinition="WhichContactToGet" connectorId="XMLFileConnector" lookupField="entryid" lookupValue="" source="../../XPress/XmlOut" />
        <LogComment Comment=" ========== The following is what we collected from the XML Trigger file using a Stored Procedure ========== "/>
        <OutputMemoryToLog/>
        <LogComment Comment=" ========== We will now collect the Contacts other information from the database ========== "/>
        <Collect dataDefinition="CollectContactInfo" connectorId="MSSQLDBConnector" lookupField="na" lookupValue="na" source="people" customQuery="exec GetPersonDetails @lastName = '~#~mSurname~#~'">
          <Conditions>
            <Condition>
              <When field="lastName" operator="Matches" value=".*">
                <LogComment Comment=" ========== We found a record for ~#~mSurname~#~ using a Stored Procedure========== "/>
                <OutputMemoryToLog/>
              </When>
              <Otherwise>
                <LogComment Comment=" ========== No contact exists for ~#~mSurname~#~ ========== "/>
              </Otherwise>
            </Condition>
          </Conditions>
        </Collect>
      </Mappings>
    </Action>
The ONLY difference is the 'Collect' we perform on the database.
<Collect dataDefinition="CollectContactInfo" connectorId="MSSQLDBConnector" source="people" lookupField="na" lookupValue="na" customQuery="exec GetPersonDetails @lastName = '~#~mSurname~#~'">
...
</Collect>
Notice that there MUST be a dataDefinition defined. This will collect all fields for the record that have been defined in the relevant dataDefinition that are returned fro mthe Stored Procedure. (Remember this can be checked by adding the <OutputMemoryToLog/> mapping
dataDefinition: The dataDefinition "CollectContactInfo" still needs to be configured, however this will define which elements we need to read from what is returned fro mthe Stored Procedure.
connectorId: This tells X-ServiceBroker which connector to use to insert the data (in this case we are using the MSSQLDBConnector which we configured earlier).
lookupField: this is set to 'na' as we do not need to build a 'WHERE' clause for this operation.
lookupValue: this is set to 'na' as we do not need to build a 'WHERE' clause for this operation.
source: The name of the table in the database where we will fetch the matching record from.
customQuery: Allows you to specify the exact query that gets used to collect the data. The following variables are available to assist in the writing of the query: *fields* = Field names to collect *source* = table to collect the data from *lookupfield* = The lookupField *entryid* = The Entry ID. You can also use any data already in memory by using ~#~ElementName~#~ e.g. ~#~UserName~#~
This custom Query contains theexec GetPersonDetails @lastName = '~#~mSurname~#~'query we testing with earlier. However instead of hardcoding the 'Flintstone' surname we are using the value that is found in the 'mSurname' field in memory.
The 'Conditions' part of the mapping simply logs a comment if the record was successfully found and thereafter prints the object in memory, which contains the data from the record that was retrieved,to the logfile. 'Otherwise' a different message is written to the logfile if the Surname, provided in the trigger XML file, was not found. Please see 'Catching Expections' for more information on exception handling relating to the DB Connector.
In the '<sxi:DataDefinitions>' section, create a new DataDefinition which looks as follows:
<!-- Use this datadefinition to get the Surname from the file which we will query the database for -->
<sxi:DataDefinition name="CollectContactInfo">
  <sxi:Fields>
    <sxi:Field name="lastName">
      <sxi:OutputField>lastName</sxi:OutputField>
    </sxi:Field>
    <sxi:Field name="firstName">
      <sxi:OutputField>firstName</sxi:OutputField>
    </sxi:Field>
    <sxi:Field name="age">
      <sxi:OutputField>age</sxi:OutputField>
    </sxi:Field>
    <sxi:Field name="mobileNum">
      <sxi:OutputField>mobileNum</sxi:OutputField>
    </sxi:Field>
  </sxi:Fields>
</sxi:DataDefinition>
#48 Re: HOWTOS » Elastic Stack » 05-02-2019 14:03:48
Logstash Configuration
Basic configuration files can be found in the SXI Github Repository
NOTE: Do NOT change the logstash.yml config - leave the log level as is - this has a performance and capacity implication if this is changed.
Create the following dir x:\SXI\Dashboard\sincedb
Copy the SXI_Logstash_Config into the x:\SXI\Dashboard\configs directory
#49 Re: HOWTOS » Elastic Stack » 05-02-2019 13:46:07
Kibana Configuration
Basic configuration files can be found in the SXI Github Repository
Change kibana.yml in X:\SXI\Dashboard\kibana\config as follows:
Uncomment Line 2. but Leave the default port of 5601
Uncomment Line 7. #server.host: "localhost" and point to your hosts ip address
Uncomment Line 18. #server.name: "your-hostname" and insert your servers hostname
Uncomment Line 22. #elasticsearch.url: "http://localhost:9200" and replace localhost with your hosts ip adress
#50 Re: HOWTOS » Elastic Stack » 05-02-2019 13:43:50
Elastic Search Configuration
Basic configuration files can be found in the SXI Github Repository
Change elasticsearch.yml in X:\SXI\Dashboard\elasticsearch\config as follows
Uncomment Line 37. ##path.logs: /path/to/logs and change to path.logs: X:/SXI/Dashboard/elasticsearch/logs
Uncomment Line 56. #network.host: 192.168.0.1 and change 192.168.0.1 to point to hosts ip address
Uncomment Line 59. #http.port: 9200 but leave the port as 9200