SXI Forum
You are not logged in.
- Topics: Active | Unanswered
#1 Re: HOWTOS » Upgrade from Oracle Java to Some other OpenJDK E.g. Corretto or Redhat » 09-12-2024 13:07:05
The new jks files can be requested from Sean
#2 HOWTOS » Upgrade from Oracle Java to Some other OpenJDK E.g. Corretto or Redhat » 09-12-2024 13:06:35
- SeanR
- Replies: 1
XLayer v2.x was shipped with Oracle Java 1.8. However due to license changes at Oracle some clients are requesting that we upgrade to OpenJDK either Redhat or Corretto in order to avoid additional costs.
Download either of the Latest 1.8 OpenJDKs and extract the JRE into the SXI directory replacing the current 1.8 JRE in X:/SXI
All XLayer modules will work correctly except XPress. This is because the JKS in XPressStation/resources/server.jks and XPressDispatch/resources/servers.jks use the DSA algorithm with a key size of 1024. Security advancements now require a newer algorithm and larger key size. The new jks use the RSA algorithm and a key size of 2048.
Replace both files and restart XPressStation and then XPressDipatch and they should continue operating as normal.
#3 HOWTOS » Config XLayer (Config and XSLT) to send JSON with spaces in elements » 19-06-2024 19:22:37
- SeanR
- Replies: 0
In order to send JSON to an API that looks as follows (NOTICE the spaced in the element names):
{
    "myFirstArrayElement": [
        {
            "json": {
                "Problem Ticket Number": "INC00012345",
                "Reference Person ID": "cr:000123"
           }
        }
    ]
}
You need to use both XLayer Configuration and XSLT
The XSLT must look as follows:
<xsl:stylesheet version="1.0" xmlns:xsl="http://www.w3.org/1999/XSL/Transform">
    <xsl:output method="xml" indent="yes" omit-xml-declaration="yes"/>
    <xsl:template match="/">
<root class="object">
    <myFirstArrayElement class="array">
        <blank class="object">
            <json type="string"><xsl:value-of select="//*[local-name() = 'mBuildBody']"></xsl:value-of></json>
        </blank>
    </workItems>
</root>
    </xsl:template>
</xsl:stylesheet>
then in your XLayer configuration you need a datadefinition with the following:
<sxi:DataDefinition name="callRPABotAPI">
<sxi:Fields>
...
<sxi:Field name="na_3">
<sxi:Rules>
<sxi:Concatenation>
<sxi:Delimiter></sxi:Delimiter>
<sxi:Fields>
<sxi:Field staticValue="yes">{"Problem Ticket Number": "</sxi:Field>
<sxi:Field>mRef_num</sxi:Field>
<sxi:Field staticValue="yes">","Reference Person ID": "</sxi:Field>
<sxi:Field>mPersid</sxi:Field>
<sxi:Field staticValue="yes">"}</sxi:Field>
</sxi:Fields>
</sxi:Concatenation>
</sxi:Rules>
<sxi:OutputField>mBuildBody</sxi:OutputField>
</sxi:Field>
...
</sxi:Fields>
</sxi:DataDefinition>where the fields mRef_num contains the value "INC00012345" and mPersid contains the value "cr:000123"
Refer to Correct JSON format from XML Stylesheet for RESTConnector for additional information on how to convert XML to JSON
#4 HOWTOS » Check if a database table has been modified » 21-02-2023 17:55:55
- SeanR
- Replies: 0
Sometimes I need to check a relitively static table (a table that doesn't change too often). It is not always possible to add a trigger to a table, however this would be an excellent way for the DB to announce that a change was persisted. An easy way to check in MYSQL/MariaDB though, is using the following query:
MYSQL
select table_schema as database_name,
       table_name,
       update_time
from information_schema.tables tab
where update_time > (current_timestamp() - interval 30 day)
      and table_type = 'BASE TABLE'
      and table_schema not in ('information_schema', 'sys',
                               'performance_schema','mysql')
      -- and table_schema = 'sigreg'
order by update_time desc;
The result will look something like the following:
database_name | table_name | update_time
--------------- |----------- |-------------
xlayerrestapi | sigreg | 2023-02-21 14:08:35.000
You can now save the update_time and if, on a later query, the update time is newer than the last update time you know that the table changed somewhere.
NOTE: The update_time will change if a record is added / deleted or updated.
An explaination of the query can be found here
This is useful for MYSQL and MariaDB.
What other ways have you found to monitor a table in a database for changes?
What suggestions are there is we only want to know about new records being added?
#5 HOWTOS » How can I identify what is holding a file/dir open » 19-10-2021 15:36:25
- SeanR
- Replies: 0
Sometimes we try to delete or rename a file and we get a message that the file is in use. If we want to find out what is using this file on Windows we can use Resource Monitor for this which comes built-in with Windows 7, 8, and 10.
Open Resource Monitor
Found by searching for Resource Monitor on the Start menu
Typing resmon.exe in the Run Menu
On the Performance tab in your Task Manager
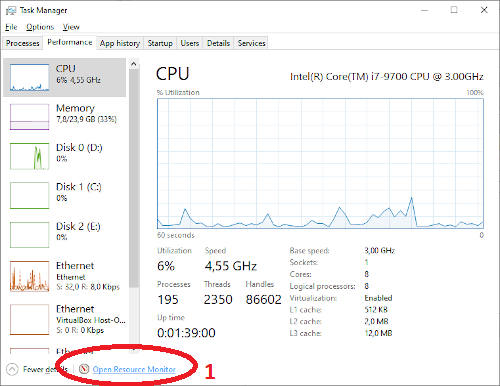
Go to the CPU tab (1)
Use the search field in the Associated Handles section (2)

When you've found the handle, you can identify the process by looking at the Image and/or PID column.
You can then try to close the application as you normally would, or, if that's not possible, just right-click the handle and kill the process directly from there.
Easy peasy!
#6 HOWTOS » Correct JSON format from XML Stylesheet for RESTConnector » 20-07-2021 08:52:46
- SeanR
- Replies: 0
On occasion a REST API requires JSON in a certain format and this can be a source of frustration. Especially if they require an array with only on element.
E.g.
{"SomeArray":["abc", 2]}
The RESTConnector will convert XML to JSON before ending the payload to the API. Therefore the above example can be easily achieved by configuring a stylesheet and giving the XML elements certain attributes to define the JSON output.
Below is an example XML:
<MyElement class="Object">
    <myName type="string">json</myName >
    <myBool type="boolean">true</myBool >
    <myInt type="number">3</myInt >
    <anArrayElement class="Array">
        <myVal type="number">4</myVal>
        <myVal type="number">5</myVal>
    </anArrayElement>
</MyElement>
This is what the output will look like:
{
    "MyElement": {
        "myName": "json",
        "myBool": true,
        "myInt": 3,
        "anArrayElement": [ 4, 5 ]
    }
}
If you wish to force an array with a single element you can simply make you xml look like this:
<myElement class="Array"><myVal>SomeValue</myVal></MyElement>And the following JSON will be produced:
{ "myElement":[ "SomeValue" ] }The full technical doc can be found here
#7 General Discussion » Using the SharePoint API » 19-07-2021 17:01:48
- SeanR
- Replies: 0
I stumbled upon this really helpful document of how to consume the SharePoint API
#8 General Discussion » CA signed Certificate for XLayer server » 01-06-2021 19:50:04
- SeanR
- Replies: 0
These steps will outline how to initially request a new certificate from GoDaddy on a windows server. This will not replace the certificate if a client already has a procedure to obtain certs for us, this is only if we are purchasing the cert ourselves.
If this is the first time you are adding a certificate to the server you will need to provide GoDaddy with a CSR (Certificate Signing Request). you will need to generate this CSR before requesting the certificate from GoDaddy.
Requirements
KeyStore Explorer
Steps
Open KeyStore Explorer and "Create a new Keystore"
In the "New KeyStore Type" dialog box that pops up select PKCS #12
Select Tools -> Generate Key Pair from the menu or press Ctrl + G
In the "Generate Key Pair" dialog box that pops up select RSA with a key size of 2048 and click OK
A new dialog box will popup and you can leave most of those values default (This will be valid for 1 year)
You need to provide additional details for the certificate before clicking OK. Just above the "Add Extensions" button there is an Icon that looks like a filofax with an "@" sign on it. Click That.
Populate the fields with valid responses (Replace the values in between <>test:
Common Name(CN): <server.name.domain.com>
Organization Unit(OU): <Company Name>
Organization Name(O): <Company Name>
Locality Name(L): <Johannesburg>
State Name(ST): <Gauteng>
Country(C): <ZA>
Click Ok. You will notice that in the "Name" field your values have been populated.
After verifying your values Click Ok
A "New Key Pair Entry Alias" dialog box will appear. Enter an appropriate alias and Click Ok
Enter and Confirm a new password in the "New Key Pair Entry Password" and click Ok
After everything has been validated you will get confirmation that the Key Pair Generation was Successful
Generate CSR
Right-Click on the alias you created and select Generate CSR
In the Generate CSR dialog box youcan select the location of the CSR file and click Ok
Request the New Certificate
On the GoDaddy website follow the prompts to create a new certificate.
When you get to the step to provide a CSR copy the contents of the file you created and past it into the space provided on the GoDaddy website.
You will get an Email when the certificate has been generated. Go to the relevant page a download the certificate (Server = "Other") A zip file will be downloaded which contains 3 files:
<randomNumber>.crt
<randomNumber>.pem
gd_bundle-g2-g1.crt
When you have this file Right-Click on the Alias you created in the key store
On the dropdown menu click on "Import CA Reply -> From File"
Select the <randomNumber>.crt file and click Import
You can Expect a "CA Reply Import Successful" message
You can now save this file as <some name>.p12
Once you have saved this file you will be able to point to it from the XLayer Servers API calls. Here is an example.
#===============================================================================
# Enable SSL operation
#===============================================================================
server.ssl.enabled=true
server.ssl.key-store-type=PKCS12
server.ssl.key-store=classpath:<some name>.p12
server.ssl.key-store-password=<password used at "New Key Pair Entry Password">
server.ssl.key-alias=<alias used in Key Pair generation>#9 Re: General Discussion » Transfer files up to 2 GB. » 01-06-2021 18:42:27
You can also use the XLayer hosted option at
#10 HOWTOS » Python script to consume the XLayer Rest API » 26-05-2021 14:46:07
- SeanR
- Replies: 0
Below is an example script in python on how to consume the XLayerAPI v3.3+
import requests
from requests.structures import CaseInsensitiveDict

print("\n")
print("About to send REST Package")
print("==========================")
print()
url = "https://10.0.0.1:9788/xlayer-api/rest/async"

headers = CaseInsensitiveDict()
headers["Accept"] = "application/json"
headers["Content-Type"] = "application/json"
headers["Authorization"] = "Basic c3hpX2NsaWVudDpQYXNzQDEyMw=="

data = """
{
    "integrationName": "FromPI-50",
    "actionName": "PI50-Python",
    "sourceId": "INC54321",
    "payload": {
        "test": "test string",
        "id": 12345
    }
}
"""

resp = requests.post(url, headers=headers, data=data, verify=False)

print(resp.status_code)
print(resp.text)
NOTES:
Remember to replace the 10.0.0.1 ip with the XLayer servers IP
verify=False - has been used as I was testing with a self-signed certificate
The authorization header in this example is based on Basic Authentication, however you can replace this with the appropriate JWT header
Be careful with the data field as this must be valid JSON. IF your data string is not well formed you can expect an error along the lines of: {"timestamp":"2021-05-26T12:44:24.148+00:00","status":400,"error":"Bad Request","message":"","path":"/xlayer-api/rest/async"}
#11 General Discussion » Find out SOME OF SCOMs defaults » 22-04-2021 18:03:59
- SeanR
- Replies: 0
To get a list of all the possible values in SCOM you can call the following ()remember you still need to get the SessionID and authenticate before calling these APIs):
Alert Columns
http://<SCOM_SERVER>/OperationsManager/resources/alertColumns
Alert Priorities
http://<SCOM_SERVER>/OperationsManager/resources/alertPriority
Alert Resolution States
http://<SCOM_SERVER>/OperationsManager/resources/alertResolutionStates
Alert Severity
http://<SCOM_SERVER>/OperationsManager/resources/alertSeverity
#12 General Discussion » Set the ResolutionState on an Alert in SCOM from PowerShell » 22-04-2021 17:21:33
- SeanR
- Replies: 0
To Change the ResolutionState of an Alerts in SCOM create a PowerShell script (e.g. ChangeResolutionState.ps1) with the following code:
$scomHeaders = New-Object "System.Collections.Generic.Dictionary[[String],[String]]"
$scomHeaders.Add('Content-Type','application/json; charset=utf-8')
$bodyraw = "AuthenticationMode:<DOMAIN>\<USERNAME>:<PASSWORD>"
$Bytes = [System.Text.Encoding]::UTF8.GetBytes($bodyraw)
$EncodedText =[Convert]::ToBase64String($Bytes)
$jsonbody = $EncodedText | ConvertTo-Json

$uriBase = 'http://<SCOM_SERVER>/OperationsManager/authenticate'
$auth = Invoke-RestMethod -Method POST -Uri $uriBase -Headers $scomheaders -body $jsonbody -UseDefaultCredentials -SessionVariable websession

$query = @{
    "alertids" = @("<UUID>");
    "comment" = "<USEFUL_COMMENT>";
    "resolutionState" = <RESOLUTION_STATE>;
}


$jsonquery = $query | ConvertTo-Json
$Response = Invoke-WebRequest -Uri "http://<SCOM_SERVER>/OperationsManager/data/alertResolutionStates" -Method Post -Body $jsonquery -ContentType "application/json" -UseDefaultCredentials -WebSession $websession
NOTES:
1. Replace the <DOMAIN>\<USERNAME>:<PASSWORD> fields with the relevant user with access to query SCOM
2. Replace <SCOM_SERVER> with the hostname/IP Address of the SCOM server.
3. Change the <USEFUL_COMMENT> that means something for your administrators.
4. Replace <RESOLUTION_STATE> with the integer from the table below.
ResolutionState
Acknowledged            = 249
Assigned to Engineering = 248
Awaiting Evidence       = 247
Closed                  = 255
New                     = 0
Resolved                = 254
Scheduled = 250#13 General Discussion » Get SCOM Alerts using PowerShell and the REST API » 22-04-2021 17:11:37
- SeanR
- Replies: 0
To COLLECT Alerts from SCOM create a PowerShell script (e.g. GetAlerts.ps1) with the following code:
$scomHeaders = New-Object "System.Collections.Generic.Dictionary[[String],[String]]"
$scomHeaders.Add('Content-Type','application/json; charset=utf-8')
$bodyraw = "AuthenticationMode:<DOMAIN>\<USERNAME>:<PASSWORD>"
$Bytes = [System.Text.Encoding]::UTF8.GetBytes($bodyraw)
$EncodedText =[Convert]::ToBase64String($Bytes)
$jsonbody = $EncodedText | ConvertTo-Json

$uriBase = 'http://<SCOM_SERVER>/OperationsManager/authenticate'
$auth = Invoke-RestMethod -Method POST -Uri $uriBase -Headers $scomheaders -body $jsonbody -UseDefaultCredentials -SessionVariable websession

$query = @{
"classId" = $null;
"objectIds" = $null;
"criteria"= "(((Severity = '1') or (Severity = '2')) AND (ResolutionState = '0'))" ;
"displayColumns" = "severity","monitoringobjectdisplayname","name","age","repeatcount","lastmodified","resolutionstate","ticketid"
}

$jsonquery = $query | ConvertTo-Json
$Response = Invoke-WebRequest -Uri "http://<SCOM_SERVER>/OperationsManager/data/alert" -Method Post -Body $jsonquery -ContentType "application/json" -UseDefaultCredentials -WebSession $websession
$alerts = ConvertFrom-Json -InputObject $Response.Content
$alerts.rows | select id,monitoringobjectdisplayname,name,severity,resolutionstate,lastmodified,age,ticketid
You will receive a Response that will look something like this
id : b506ce29-9bb8-4c93-8be0-6a53dfc68757
monitoringobjectdisplayname : demohost01.sxi.local
name : OleDB: Results Error
severity : Error
resolutionstate : New
lastmodified : 2021-04-22T08:20:41.2000000Z
age : 6 hours, 46 minutes
ticketid :id : f1400c42-1699-4e00-95fb-9482418be391
monitoringobjectdisplayname : demohost01.sxi.local
name : System Center Management Health Service Unloaded System Rule(s)
severity : Error
resolutionstate : New
lastmodified : 2021-04-22T07:57:31.3270000Z
age : 7 hours, 9 minutes
ticketid :id : f1f3fd94-0a4d-4adc-bab6-960013d52f30
monitoringobjectdisplayname : demohost02.sxi.local
name : OleDB: Results Error
severity : Error
resolutionstate : New
lastmodified : 2021-04-22T08:20:41.2000000Z
age : 6 hours, 46 minutes
ticketid :
The $query can be changed to fine-tune what you are collecting. Here are some starting parameters
Severity
0 - Information
1 - Warning
2 - Error
Priority
0 - Low
1 - Medium
2 - High
ResolutionState
Acknowledged            = 249
Assigned to Engineering = 248
Awaiting Evidence       = 247
Closed                  = 255
New                     = 0
Resolved                = 254
Scheduled = 250#14 Re: HOWTOS » Collect Alerts from SCOM using POSTMAN » 22-04-2021 16:08:27
To update an Alert you have to use the Alert's UUID and post to the following url (remember that you need to set the Content-Type header and get the SessionID the same way you did when collecting the the Alerts):
http://<SCOM Server>/OperationsManager/data/alertResolutionStates
add this to the body
{
"alertids":["<UUID>"],
"comment":"Closed from Postman",
"resolutionState": 254
}
This will change the Alert Status to Resolved and will add a comment to the "History" tab under the Alert's Properties.
Below are the default ResolutionCodes for SCOM2019:
Acknowledged            = 249
Assigned to Engineering = 248
Awaiting Evidence       = 247
Closed                  = 255
New                     = 0
Resolved                = 254
Scheduled = 250#15 Re: HOWTOS » Using a regex on a Substitute Rules » 22-04-2021 09:04:22
This still doesn't explain why you are not doing a second split.
E.g.
<sxi:Field name="mServer">
          <sxi:Rules>
            <sxi:Split>
              <sxi:Delimiter>\\</sxi:Delimiter>
              <sxi:OutputFields>
                <sxi:OutputField index="0">TmpServer</sxi:OutputField>
              </sxi:OutputFields>
            </sxi:Split>
            <sxi:TrimAllBlanks/>
          </sxi:Rules>
          <sxi:OutputField>Omit</sxi:OutputField>
        </sxi:Field>
        <sxi:Field name="TmpServer">
          <sxi:Rules>
            <sxi:Split>
              <sxi:Delimiter>:</sxi:Delimiter>
              <sxi:OutputFields>
                <sxi:OutputField index="1">Server</sxi:OutputField>
              </sxi:OutputFields>
            </sxi:Split>
          </sxi:Rules>
          <sxi:OutputField>Omit</sxi:OutputField>
        </sxi:Field>
If you want to use regex perhaps provide the full source field example and we can look at one step to get the value you need.
#16 Re: HOWTOS » Collect Alerts from SCOM using POSTMAN » 22-04-2021 08:02:27
To collect all Alerts with a resolution state of "new" use this in the body of your POST:
{"criteria":"(ResolutionState = '0')",
    "displayColumns": [
        "resolutionstate","severity","monitoringobjectdisplayname","name","age","repeatcount","lastmodified"
    ]
}
Note:
All columns defined in the displayColumns array seem to need to be in LOWERCASE
#17 HOWTOS » Collect Alerts from SCOM using POSTMAN » 21-04-2021 19:40:26
- SeanR
- Replies: 2
MS SCOM 2019 has a REST API which can be consumed directly in order to get details about alerts.
To connect to SCOM from a testing tool like Postman you need to do the following
Authenticate
You need to Base64 encode the following:
AuthenticationMode:DOMAIN\Username:Password
you will get something that looks like this
QXV0aGVudGljYXRpb25Nb2RlOkRPTUFJTlxVc2VybmFtZTpQYXNzd29yZA==
Set the following header
Content-Type: application/json
Call the following API
and place the base64 encoded string inside single quotes and add it to the body of your API call.
The response you receive will be a cookie with key value which looks as follows
SCOMSessionId - ivG2Q98PIBJiauARK9TP1LhiOKv2Fs63Dj4sXe0mpd0%3D
Notice that the SCOMSessionID is URLEncoded (you can decode the URL using this online tool) you need to decode that before you can use it.
Based on the URL Decoded SessionID from aboce you will get
ivG2Q98PIBJiauARK9TP1LhiOKv2Fs63Dj4sXe0mpd0=
Request Alerts
Using the decoded SessionID from the previous step, setup the following headers:
- Content-Type: application/json
- SCOM-CSRF-TOKEN: ivG2Q98PIBJiauARK9TP1LhiOKv2Fs63Dj4sXe0mpd0=
Now POST to the following URL
and put the following into the body of your request
{"criteria":"((Severity = '2') OR (Severity = '1'))",
    "displayColumns": [
        "severity","monitoringobjectdisplayname","name","age","repeatcount"
    ]
}
The important part of the response you can expect will look as follows:
"rows": [
        {
            "id": "21ed9127-1cfd-4f44-bb1e-0801c43008c8",
            "severity": "Error",
            "monitoringobjectdisplayname": "Data Warehouse Synchronization Service",
            "name": "Data Warehouse failed to deploy reports for a management pack to SQL Reporting Services Server",
            "age": "1 hours, 44 minutes",
            "repeatcount": 0
        },
        {
            "id": "c84e3e47-0637-4eeb-87fa-0bc358c79712",
            "severity": "Warning",
            "monitoringobjectdisplayname": "SXISCOM.sxi.local",
            "name": "Power Shell Script failed to run",
            "age": "1 hours, 17 minutes",
            "repeatcount": 0
        }
]
Notes:
The "cirteria" in the request can be changed to catch different kinds of alerts or Resolution statuses.
The "displayColumns" array in the request will be the fields that are returned as a response to your request.
#18 Re: HOWTOS » Using a regex on a Substitute Rules » 21-04-2021 19:10:46
Is there a reason you didn't simply split on the ":" and put element [1] into an output field?
#19 Re: HOWTOS » Subtracting Dates » 05-02-2021 12:11:37
Nope does not work on early dates.
Not sure from which date this will work but check start date 1989-05-01 01:07:54 and end date 1989-05-02 01:07:54 for example
This has been fixed in v2.1P9
There are now 2 rules:
- DateToEpoch: This will return the number of SECONDS since 1970-01-01 00:00:00
- DateToMilliseconds: This will return the number of MILLISECONDS since 1970-01-01 00:00:00
#21 Re: Utils and Useful little tools » LDAP (Active Directory) GUI » 26-01-2021 16:04:08
Another tool is ADExplorer from Sysinternals
#22 Re: General Discussion » Windows Authentication to SQL server from Java » 12-01-2021 15:01:49
Here is an example:
<Connector id="XlayerDB" type="DB">
      <Connection xsi:type="sxi:MSSQL">
        <sxi:Server>127.0.0.1</sxi:Server>
        <sxi:User>myuser</sxi:User>
        <sxi:Password>secret</sxi:Password>
        <sxi:RetryDelay>10</sxi:RetryDelay>
        <sxi:DBName>SomeDB</sxi:DBName>
        <sxi:Properties>
          <sxi:Property name="useNTLMv2" value="true"/>
          <sxi:Property name="domain" value="ACME"/>
        </sxi:Properties>
        <sxi:Port>1433</sxi:Port>
      </Connection>
      <sxi:ReturnCodes>
        <sxi:Success/>
        <sxi:RecoverableError>
          <sxi:Code>.+Read timed out.+</sxi:Code>
          <sxi:Code>.*Invalid state.+</sxi:Code>
          <sxi:Code>.*SHUTDOWN is in progress.+</sxi:Code>
          <sxi:Code>I/O Error: Connection reset by peer: socket write error</sxi:Code>
        </sxi:RecoverableError>
      </sxi:ReturnCodes>
</Connector>#23 Utils and Useful little tools » Tools to backup config » 09-12-2020 15:04:30
- SeanR
- Replies: 0
XLayer is installing a Git repository onto the XLayer server. (using Gitea: See how to install this here if you would like to play on your own machine.)
This will be used as a secure place to save a client's XLayer configurations. Use a tool like SparkleShare to automatically update the repository for the specific client. (See how to install and configure here)
#24 Utils and Useful little tools » ngrok to expose your URL from behind a firewall or natted address » 13-11-2020 07:12:21
- SeanR
- Replies: 0
This is a great little tool if you are testing your web service at home and need to have it consumed from outside your own network. This essentially sets up a tunnel to your internal http server/web api that passes traffic to and fro. Perfect for development testing.
Their description: One command for an instant, secure URL to your localhost server through any NAT or firewall.
Download and run a program (single file no need to install anything) on your machine and provide it the port of a network service, usually a web server.
Connect to the ngrok cloud service which accepts traffic on a public address.
Traffic is relayed through to the ngrok process running on your machine and then on to the local address you specified.
#25 Utils and Useful little tools » LDAP (Active Directory) GUI » 03-11-2020 11:49:54
- SeanR
- Replies: 1
This little gem helps to visualize the records in a LDAP server.